本快速上手指南包含的内容:
- 安装和准备 Pulumi CLI 工具
- 准备 Pulumi Cloud 账号,并创建个人的 Access Token
- 准备 Azure 的账号,用交互的方式登录 Azure CLI
- 创建一个简单的 Pulumi 项目,用于 Python 语言的主程序部署 Azure 资源
- 删除环境中的所有资源
准备工作
在 MacOS 环境中安装 Pulumi CLI 可以通过 Homebrew 安装,也可以通过下载二进制文件安装。Pulumi CLI 在本地环境中用于创建、部署和管理 Pulumi 项目。它需要依赖于 Pulumi Cloud 服务,作为命令行工具交互的后端。
1
| brew install pulumi/tap/pulumi
|
安装完成后,可以通过 pulumi version 命令查看 Pulumi CLI 的版本信息。
Pulumi Cloud 是 Pulumi 的后端服务,用于存储 Pulumi 项目的状态信息,以及提供一些其他的服务。在使用 Pulumi CLI 之前,需要先登录 Pulumi Cloud 服务。
Pulumi CLI 在本地环境中,可以使用 ‘pulumi login’ 默认的交互方式,完成在命令行中的用户认证;我推荐使用Pulumi 的 Access Token 来在本地 完成命令行的登录认证过程。这种非交付方式,可以在后续的 CI/CD 环境中使用。
参考下图,登录 Pulumi Cloud 服务,获取 Access Token。
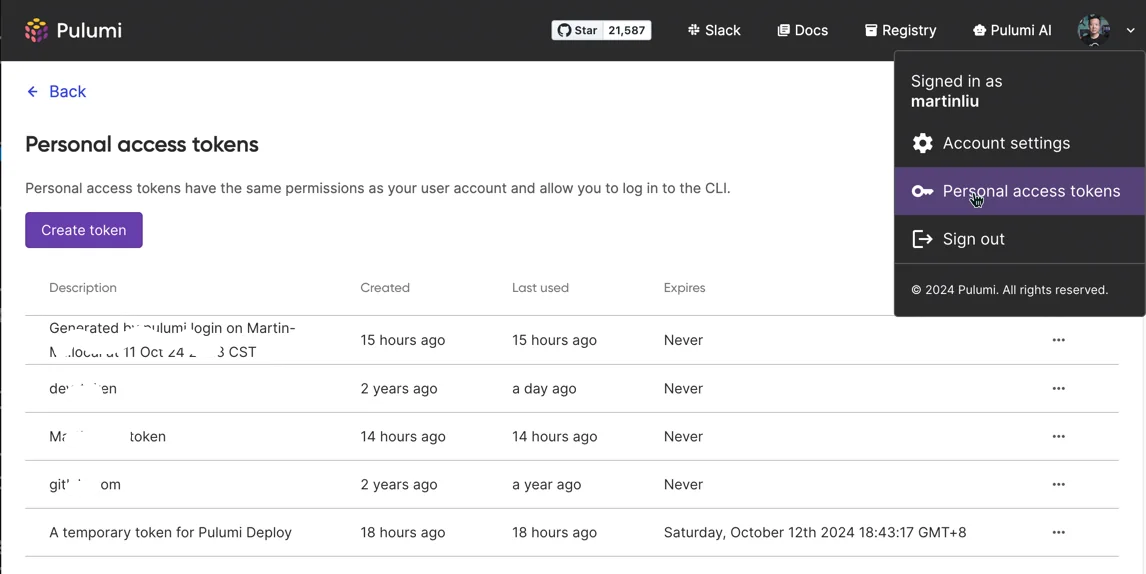
在命令行中,将 Access Token 设置为环境变量,用于后续的登录认证。
1
2
3
| export PULUMI_ACCESS_TOKEN=pul-ACT+++++++++++++++++++++++++++++++++++++++++++++++
pulumi whoami
martinliu
|
实际上,Pulumi CLI 会先在环境变量中查找 PULUMI_ACCESS_TOKEN,如果找到了就直接使用 Token 完成登录认证的过程,可以使用 ‘pulumi whoami’ 命令确认是否登录成功,以及当前所使用的 Pulumi Cloud 的用户名。
当然,也可以使用 pulumi login 命令,通过交互的方式登录 Pulumi Cloud 服务。
Azure CLI 是 Azure 的命令行工具,用于在本地环境中与 Azure 云服务进行交互。本文省略了 Azure CLI 的登录认证过程,为了方便期间,可以使用 az login 命令,用网页交互的方式,完成命令行中本地 Azure CLI 的登录认证。
可以校验一下 Azure CLI 的登录认证是否成功。
在上面的信息输出中,你可以看到当前的 Azure 账号订阅等信息。Pulumi CLI 会使用 Azure CLI 的登录认证信息,来完成 Azure 云服务的资源部署。
在完成了上述的 Pulumi CLI 和 Azure CLI 的准备工作后,我们可以开始创建一个简单的 Pulumi 项目,用于部署 Azure 资源。
创建 Pulumi 项目
在本地环境中,使用 Pulumi 命令 ‘pulumi new azure-python’ 创建一个新的 Pulumi 项目,用于部署 Azure 资源。
‘pulumi new’ 命令会在一个空目录中初始化一个 Pulumi 项目。在初始化的过程中,Pulumi CLI 会询问一些问题,用于生成一个简单的 Python 代码文件。在下面的示例中,我只是制定了 Azure 的区域为 ‘East Asia’,其他的都使用默认值。
 1
 2
 3
 4
 5
 6
 7
 8
 9
10
11
12
13
14
15
16
17
18
19
20
21
22
23
24
25
26
27
28
29
30
31
32
33
34
35
36
37
38
39
40
41
42
43
44
45
46
47
48
49
50
51
52
53
54
55
56
57
58
59
60
61
62
63
64
65
66
67
68
69
70
71
72
73
74
75
76
77
78
79
80
81
82
83
84
85
86
87
88
89
90
91
92
93
94
95
| (base) ➜ first-project pulumi new azure-python
Logging in using access token from PULUMI_ACCESS_TOKEN
This command will walk you through creating a new Pulumi project.
Enter a value or leave blank to accept the (default), and press <ENTER>.
Press ^C at any time to quit.
Project name (first-project):
Project description (A minimal Azure Native Python Pulumi program):
Created project 'first-project'
Please enter your desired stack name.
To create a stack in an organization, use the format <org-name>/<stack-name> (e.g. `acmecorp/dev`).
Stack name (dev):
Created stack 'dev'
The toolchain to use for installing dependencies and running the program pip
The Azure location to use (azure-native:location) (WestUS2): eastasia
Saved config
Installing dependencies...
Creating virtual environment...
Finished creating virtual environment
Updating pip, setuptools, and wheel in virtual environment...
Requirement already satisfied: pip in ./venv/lib/python3.10/site-packages (22.3.1)
Collecting pip
Using cached pip-24.2-py3-none-any.whl (1.8 MB)
Requirement already satisfied: setuptools in ./venv/lib/python3.10/site-packages (65.5.0)
Collecting setuptools
Using cached setuptools-75.1.0-py3-none-any.whl (1.2 MB)
Collecting wheel
Using cached wheel-0.44.0-py3-none-any.whl (67 kB)
Installing collected packages: wheel, setuptools, pip
Attempting uninstall: setuptools
Found existing installation: setuptools 65.5.0
Uninstalling setuptools-65.5.0:
Successfully uninstalled setuptools-65.5.0
Attempting uninstall: pip
Found existing installation: pip 22.3.1
Uninstalling pip-22.3.1:
Successfully uninstalled pip-22.3.1
Successfully installed pip-24.2 setuptools-75.1.0 wheel-0.44.0
Finished updating
Installing dependencies in virtual environment...
Collecting pulumi<4.0.0,>=3.0.0 (from -r requirements.txt (line 1))
Using cached pulumi-3.136.1-py3-none-any.whl.metadata (11 kB)
Collecting pulumi-azure-native<3.0.0,>=2.0.0 (from -r requirements.txt (line 2))
Using cached pulumi_azure_native-2.66.0-py3-none-any.whl.metadata (4.2 kB)
Collecting protobuf~=4.21 (from pulumi<4.0.0,>=3.0.0->-r requirements.txt (line 1))
Using cached protobuf-4.25.5-cp37-abi3-macosx_10_9_universal2.whl.metadata (541 bytes)
Collecting grpcio~=1.66.2 (from pulumi<4.0.0,>=3.0.0->-r requirements.txt (line 1))
Using cached grpcio-1.66.2-cp310-cp310-macosx_12_0_universal2.whl.metadata (3.9 kB)
Collecting dill~=0.3 (from pulumi<4.0.0,>=3.0.0->-r requirements.txt (line 1))
Using cached dill-0.3.9-py3-none-any.whl.metadata (10 kB)
Collecting six~=1.12 (from pulumi<4.0.0,>=3.0.0->-r requirements.txt (line 1))
Using cached six-1.16.0-py2.py3-none-any.whl.metadata (1.8 kB)
Collecting semver~=2.13 (from pulumi<4.0.0,>=3.0.0->-r requirements.txt (line 1))
Using cached semver-2.13.0-py2.py3-none-any.whl.metadata (5.0 kB)
Collecting pyyaml~=6.0 (from pulumi<4.0.0,>=3.0.0->-r requirements.txt (line 1))
Using cached PyYAML-6.0.2-cp310-cp310-macosx_11_0_arm64.whl.metadata (2.1 kB)
Collecting debugpy~=1.8.5 (from pulumi<4.0.0,>=3.0.0->-r requirements.txt (line 1))
Using cached debugpy-1.8.7-py2.py3-none-any.whl.metadata (1.1 kB)
Collecting parver>=0.2.1 (from pulumi-azure-native<3.0.0,>=2.0.0->-r requirements.txt (line 2))
Using cached parver-0.5-py3-none-any.whl.metadata (2.7 kB)
Collecting typing-extensions>=4.11 (from pulumi-azure-native<3.0.0,>=2.0.0->-r requirements.txt (line 2))
Using cached typing_extensions-4.12.2-py3-none-any.whl.metadata (3.0 kB)
Collecting arpeggio>=1.7 (from parver>=0.2.1->pulumi-azure-native<3.0.0,>=2.0.0->-r requirements.txt (line 2))
Using cached Arpeggio-2.0.2-py2.py3-none-any.whl.metadata (2.4 kB)
Collecting attrs>=19.2 (from parver>=0.2.1->pulumi-azure-native<3.0.0,>=2.0.0->-r requirements.txt (line 2))
Using cached attrs-24.2.0-py3-none-any.whl.metadata (11 kB)
Using cached pulumi-3.136.1-py3-none-any.whl (274 kB)
Using cached pulumi_azure_native-2.66.0-py3-none-any.whl (89.7 MB)
Using cached debugpy-1.8.7-py2.py3-none-any.whl (5.2 MB)
Using cached dill-0.3.9-py3-none-any.whl (119 kB)
Using cached grpcio-1.66.2-cp310-cp310-macosx_12_0_universal2.whl (10.7 MB)
Using cached parver-0.5-py3-none-any.whl (15 kB)
Using cached protobuf-4.25.5-cp37-abi3-macosx_10_9_universal2.whl (394 kB)
Using cached PyYAML-6.0.2-cp310-cp310-macosx_11_0_arm64.whl (171 kB)
Using cached semver-2.13.0-py2.py3-none-any.whl (12 kB)
Using cached six-1.16.0-py2.py3-none-any.whl (11 kB)
Using cached typing_extensions-4.12.2-py3-none-any.whl (37 kB)
Using cached Arpeggio-2.0.2-py2.py3-none-any.whl (55 kB)
Using cached attrs-24.2.0-py3-none-any.whl (63 kB)
Installing collected packages: arpeggio, typing-extensions, six, semver, pyyaml, protobuf, grpcio, dill, debugpy, attrs, pulumi, parver, pulumi-azure-native
Successfully installed arpeggio-2.0.2 attrs-24.2.0 debugpy-1.8.7 dill-0.3.9 grpcio-1.66.2 parver-0.5 protobuf-4.25.5 pulumi-3.136.1 pulumi-azure-native-2.66.0 pyyaml-6.0.2 semver-2.13.0 six-1.16.0 typing-extensions-4.12.2
Finished installing dependencies
Finished installing dependencies
Your new project is ready to go! ✨
To perform an initial deployment, run `pulumi up`
(base) ➜ first-project
|
下图是初始化后的项目目录结构。

在项目目录中,有一个 Pulumi.yaml 文件,用于描述项目的基本信息,如项目名称、描述、编程语言等。
 1
 2
 3
 4
 5
 6
 7
 8
 9
10
11
| name: first-project
description: A minimal Azure Native Python Pulumi program
runtime:
name: python
options:
toolchain: pip
virtualenv: venv
config:
pulumi:tags:
value:
pulumi:template: azure-python
|
在项目目录中,有一个 Pulumi.dev.yaml 文件,用于描述项目的配置信息,如 Azure 的订阅 ID、资源组名称、区域等。
1
2
| config:
azure-native:location: eastasia
|
在项目目录中,有一个 __main__.py 文件,用于描述项目的主程序,用于部署 Azure 资源。
 1
 2
 3
 4
 5
 6
 7
 8
 9
10
11
12
13
14
15
16
17
18
19
20
21
22
23
24
25
26
27
28
29
30
31
| """An Azure RM Python Pulumi program"""
import pulumi
from pulumi_azure_native import storage
from pulumi_azure_native import resources
# Create an Azure Resource Group 创建一个 Azure 资源组
resource_group = resources.ResourceGroup("resource_group")
# Create an Azure resource (Storage Account) 创建一个 Azure 资源(存储账户)
account = storage.StorageAccount(
"sa",
resource_group_name=resource_group.name,
sku={
"name": storage.SkuName.STANDARD_LRS,
},
kind=storage.Kind.STORAGE_V2,
)
# Export the primary key of the Storage Account 导出存储账户的主键
primary_key = (
pulumi.Output.all(resource_group.name, account.name)
.apply(
lambda args: storage.list_storage_account_keys(
resource_group_name=args[0], account_name=args[1]
)
)
.apply(lambda accountKeys: accountKeys.keys[0].value)
)
pulumi.export("primary_storage_key", primary_key)
|
在项目目录中,有一个 requirements.txt 文件,用于描述项目的依赖信息,如 Pulumi 和 Azure Native SDK 的版本信息。
1
2
| pulumi>=3.0.0,<4.0.0
pulumi-azure-native>=2.0.0,<3.0.0
|
在使用 pulumi new 创建新项目时,可以通过指定 --language 参数来选择所需的语言。例如,默认语言确实是 Python,但你可以根据需求选择其他支持的语言,如 TypeScript、JavaScript、Go 或 C#。以下是示例用法:
1
| pulumi new <template-name> --language <language>
|
其中 <language> 可以是以下几种:
typescript(TypeScript)javascript(JavaScript)python(Python)go(Go)csharp(C#)
如果想创建一个 TypeScript 项目,命令可以如下:
1
| pulumi new <template-name> --language typescript
|
如果没有指定语言,则会默认使用 Python。
当前生成了一个默认的 Python 主程序模板,Pulumi CLI 会启动本地的语言服务器,执行此 Python 程序,完成和 Azure Cloud 的交互工作,实现 Python 程序中资源部署的意图,开发人员可以在此基础上,根据自己的需求,修改和扩展 Python 代码,实现对 Azure 资源的部署和更新。模板 Python 代码中,创建了一个 Azure 资源组和一个 Azure 存储账,在最后将 ‘primary_key’导出显示在命令中,实现了 Python 程序对外的输出。
部署 Pulumi 项目
在项目目录中,使用 pulumi up 命令,完成 Azure 资源的部署。
 1
 2
 3
 4
 5
 6
 7
 8
 9
10
11
12
13
14
15
16
17
18
19
20
21
22
23
24
25
26
27
28
29
30
31
32
33
| (base) ➜ first-project pulumi up
Previewing update (dev)
View in Browser (Ctrl+O): https://app.pulumi.com/martinliu/first-project/dev/previews/539d74d9-64ec-4fb8-aa69-eb08ddbe4eea
Type Name Plan
+ pulumi:pulumi:Stack first-project-dev create
+ ├─ azure-native:resources:ResourceGroup resource_group create
+ └─ azure-native:storage:StorageAccount sa create
Outputs:
primary_storage_key: output<string>
Resources:
+ 3 to create
Do you want to perform this update? yes
Updating (dev)
View in Browser (Ctrl+O): https://app.pulumi.com/martinliu/first-project/dev/updates/1
Type Name Status
+ pulumi:pulumi:Stack first-project-dev created (36s)
+ ├─ azure-native:resources:ResourceGroup resource_group created (3s)
+ └─ azure-native:storage:StorageAccount sa created (29s)
Outputs:
primary_storage_key: "key++++++++++++++++++++++++++++++++++++++++++++++++++++++"
Resources:
+ 3 created
Duration: 38s
|
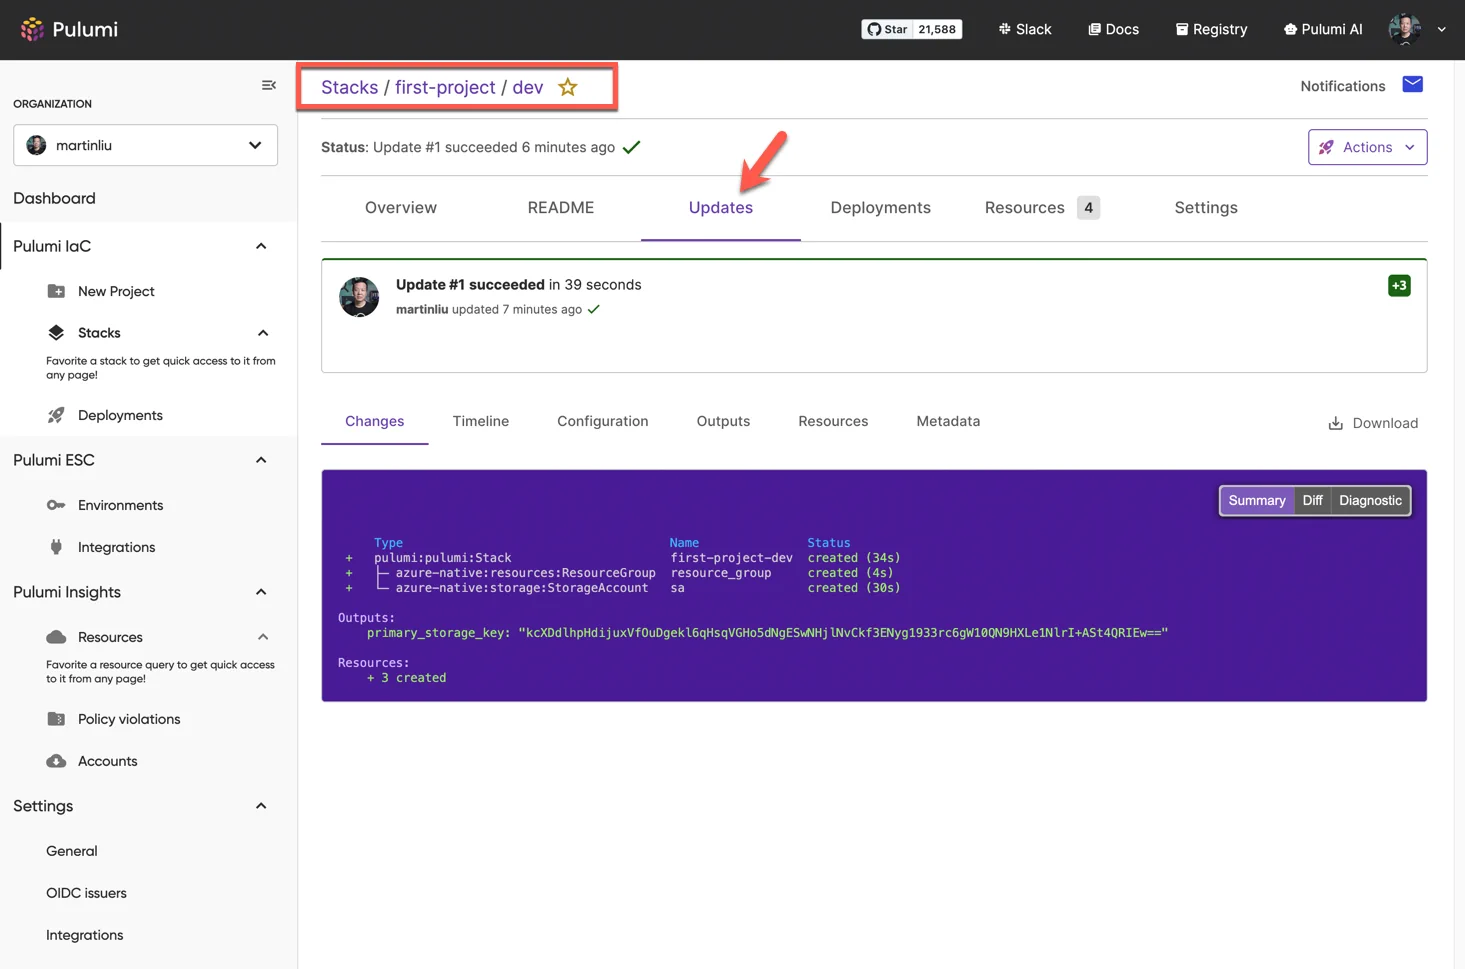
以上 pulumi up 命令是一个交互式的执行过程,可以在命令行中输入 yes,确认是否执行资源的创建。在执行过程中,Pulumi CLI 会生成一个更新信息,用于展示资源的创建状态,以及资源的状态。在更新信息中,可以看到已经创建的资源类型、名称、状态等信息。在更新信息中,还会显示一个 URL,用于在浏览器中查看更新信息。
在部署完毕之后,我们可以在 Pulumi Cloud 网页中看到此项目的部署过程,以及资源的状态信息。如下图所示。
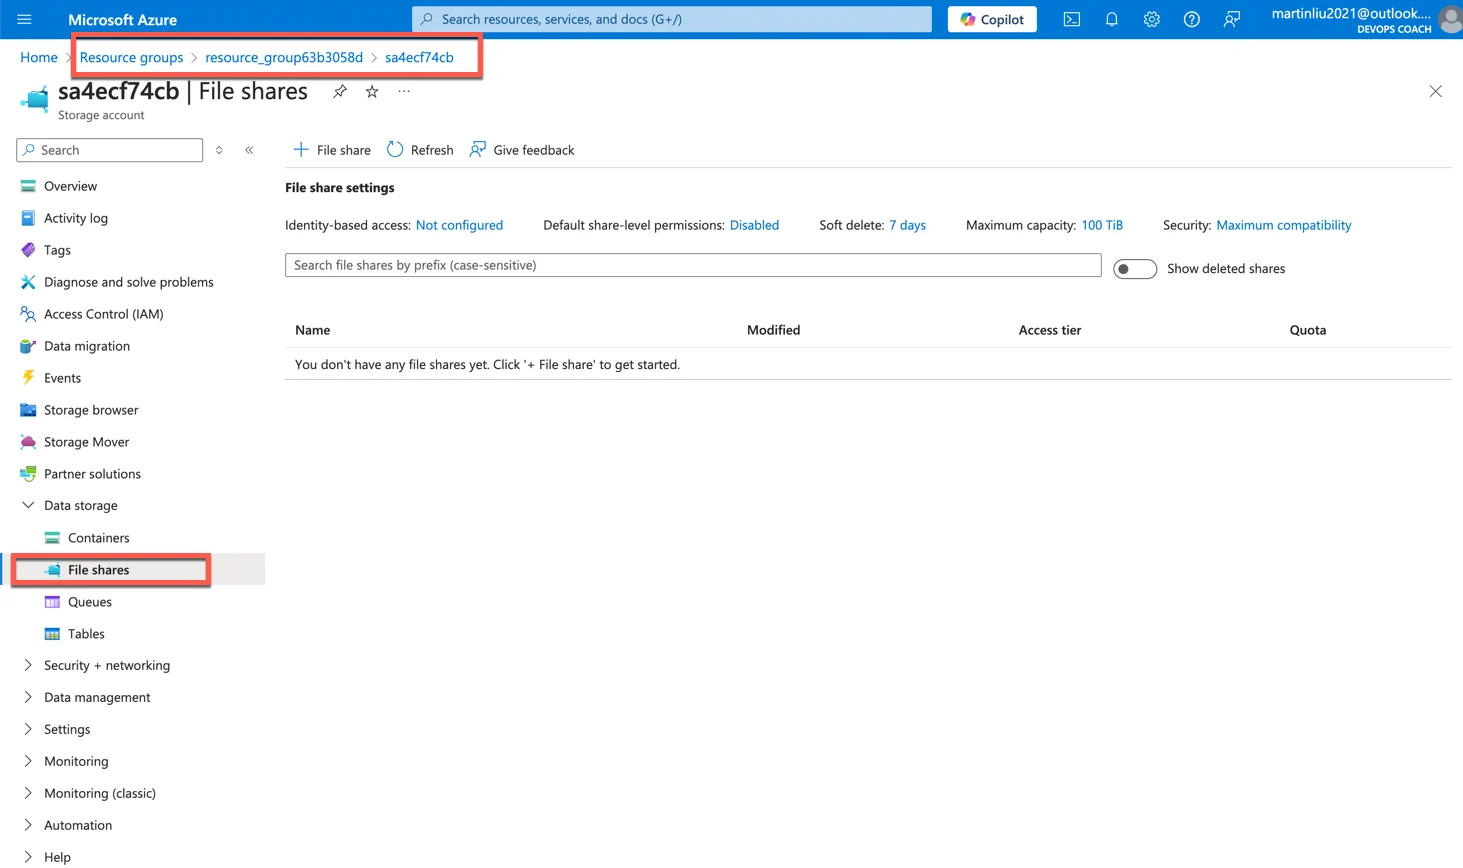
下面在 Azure 门户中,可以看到创建的资源组和存储账户。我们可以看到,资源组的名称是 resource_group,存储账户的名称是 sa开头的资源,后面跟随着一些随机字符。
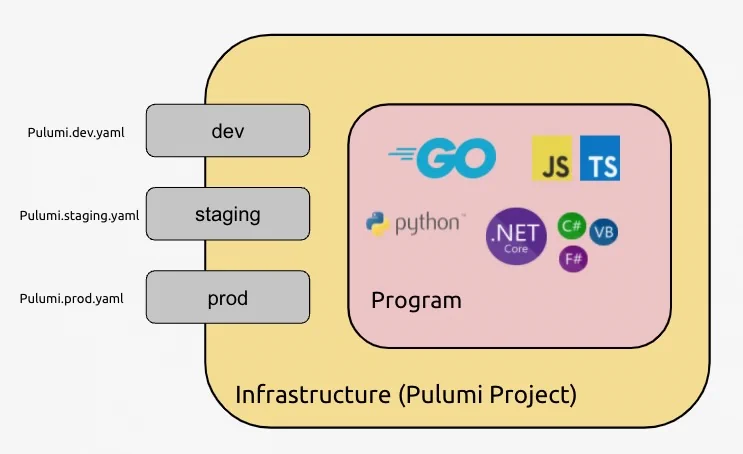
根据以上的操作体验,我们可以参考下图,理解 Pulumi CLI 和 Azure 云服务之间的交互过程。
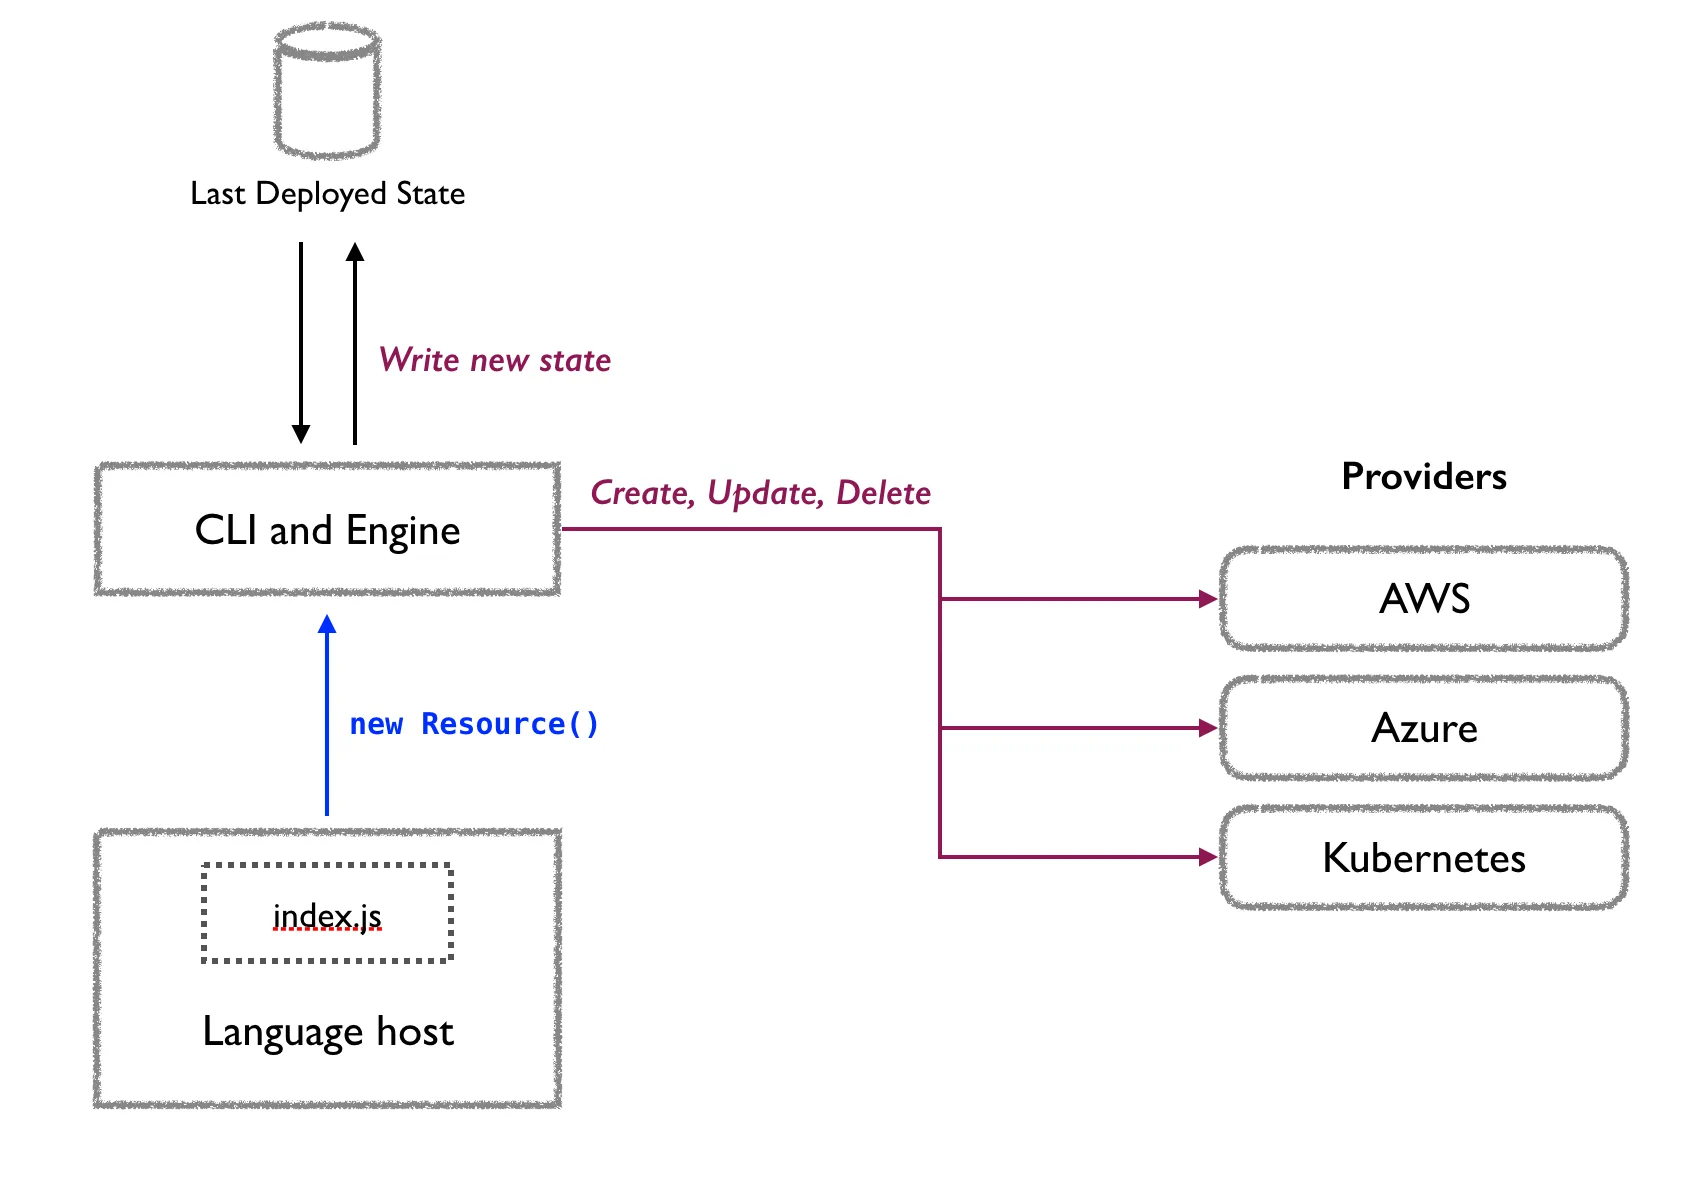
pulumi 命令行工具本身是一个部署引擎,它会启动一个本地的语言服务器,用于执行 Python 程序,完成对 Azure 云服务的资源部署。
本 Python 测试项目是一个典型的 Pulumi 项目模板,它使用 IaC 的方式,将 Azure 资源的部署和更新,通过 Python 代码的方式,实现了对 Azure 资源的管理。这个 Pulumi 项目的部署结果称为 ‘Stack’,是一个 Azure 基础设施的技术栈,本项目模板目录可以在你的业务应用项目的根目录中,作为一个子目录,用于管理 Azure 资源的部署和更新。随着业务项目的开发和迭代,可以通过 Pulumi CLI 工具,完成 Azure 多个环境资源的部署和更新,例如开发环境、测试环境、生产环境等。
更新 Pulumi 项目
在准备好以上的环境后,假设我们收到了一个新的业务需求,需要在 Azure 存储账户中部署一个 index.html 文件,用于展示一个简单的静态网页。我们可以通过修改 __main__.py 文件,增加一个 Azure Blob 存储的资源,用于部署 index.html 文件。
为了演示这个过程,我们现在命令,在当前的项目目录中,创建一个 index.html 文件。
1
2
3
4
5
6
7
| cat <<EOT > index.html
<html>
<body>
<h1>Hello, Pulumi!</h1>
</body>
</html>
EOT
|
当然,这个 index.html 文件是业务需求成果,是不应该放在 IaC 程序代码的目录中的。
下面需要在 __main__.py 文件中,修改 Azure Blob 存储的资源属性,用于部署 index.html 文件。
 1
 2
 3
 4
 5
 6
 7
 8
 9
10
11
12
13
14
15
16
17
18
19
20
| # Enable static website support 启用静态网站支持
static_website = storage.StorageAccountStaticWebsite(
"staticWebsite",
account_name=account.name,
resource_group_name=resource_group.name,
index_document="index.html",
)
# Upload the file 将文件上传到存储账户
index_html = storage.Blob(
"index.html",
resource_group_name=resource_group.name,
account_name=account.name,
container_name=static_website.container_name,
source=pulumi.FileAsset("index.html"),
content_type="text/html",
)
# Web endpoint to the website 在命令行中导出网站的 Web 端点
pulumi.export("staticEndpoint", account.primary_endpoints.web)
|
在完成了以上的修改后,我们可以使用 pulumi up 命令,完成 Azure 资源的更新。
 1
 2
 3
 4
 5
 6
 7
 8
 9
10
11
12
13
14
15
16
17
18
19
20
21
22
23
24
25
26
27
28
29
30
31
32
33
34
35
36
37
38
39
| (base) ➜ first-project ls
Pulumi.dev.yaml __main__.py index.html venv
Pulumi.yaml __pycache__ requirements.txt
(base) ➜ first-project pulumi up
Previewing update (dev)
View in Browser (Ctrl+O): https://app.pulumi.com/martinliu/first-project/dev/previews/613fd4dc-ce8b-4a32-a8f6-713c2e4dc839
Type Name Plan
pulumi:pulumi:Stack first-project-dev
+ ├─ azure-native:storage:StorageAccountStaticWebsite staticWebsite create
+ └─ azure-native:storage:Blob index.html create
Outputs:
+ staticEndpoint : "https://sa4ecf74cb.z7.web.core.windows.net/"
Resources:
+ 2 to create
3 unchanged
Do you want to perform this update? yes
Updating (dev)
View in Browser (Ctrl+O): https://app.pulumi.com/martinliu/first-project/dev/updates/2
Type Name Status
pulumi:pulumi:Stack first-project-dev
+ ├─ azure-native:storage:StorageAccountStaticWebsite staticWebsite created (5s)
+ └─ azure-native:storage:Blob index.html created (3s)
Outputs:
primary_storage_key: "key++++++++++++++++++++++++++++++++++++++++++++++++++++++"
+ staticEndpoint : "https://sa4ecf74cb.z7.web.core.windows.net/"
Resources:
+ 2 created
3 unchanged
Duration: 13s
|
在以上命令执行的过程中,我们也可以在 Pulumi Cloud 网页中看到此项目的部署过程,以及资源的状态信息。还可以在 Azure 门户中,看到更新后的资源组和存储账户。
现在,让我们在命令行中,查看导出的 staticEndpoint 输出,用于验证所部署的静态网站。
1
2
3
4
5
6
7
8
| curl $(pulumi stack output staticEndpoint)
(base) ➜ first-project curl $(pulumi stack output staticEndpoint)
<html>
<body>
<h1>Hello, Pulumi!</h1>
</body>
</html>
(base) ➜ first-project
|
在浏览器中,访问 staticEndpoint 输出的 URL,可以看到部署的静态网站。
删除 Pulumi 项目
假设我们完成了今天的开发和测试工作,我们可以使用 pulumi destroy 命令,删除所有当前在 Azure 上所部署的资源。
 1
 2
 3
 4
 5
 6
 7
 8
 9
10
11
12
13
14
15
16
17
18
19
20
21
22
23
24
25
26
27
28
29
30
31
32
33
34
35
36
37
38
39
40
41
42
| (base) ➜ first-project pulumi destroy
Previewing destroy (dev)
View in Browser (Ctrl+O): https://app.pulumi.com/martinliu/first-project/dev/previews/3d3257e7-c853-4d89-bfc0-461a37bf94ee
Type Name Plan
- pulumi:pulumi:Stack first-project-dev delete
- ├─ azure-native:storage:Blob index.html delete
- ├─ azure-native:storage:StorageAccountStaticWebsite staticWebsite delete
- ├─ azure-native:storage:StorageAccount sa delete
- └─ azure-native:resources:ResourceGroup resource_group delete
Outputs:
- primary_storage_key: "key++++++++++++++++++++++++++++++++++++++++++++++++++++++"
- staticEndpoint : "https://sa4ecf74cb.z7.web.core.windows.net/"
Resources:
- 5 to delete
Do you want to perform this destroy? yes
Destroying (dev)
View in Browser (Ctrl+O): https://app.pulumi.com/martinliu/first-project/dev/updates/3
Type Name Status
- pulumi:pulumi:Stack first-project-dev deleted (0.69s)
- ├─ azure-native:storage:Blob index.html deleted (5s)
- ├─ azure-native:storage:StorageAccountStaticWebsite staticWebsite deleted (1s)
- ├─ azure-native:storage:StorageAccount sa deleted (7s)
- └─ azure-native:resources:ResourceGroup resource_group deleted (83s)
Outputs:
- primary_storage_key: "key++++++++++++++++++++++++++++++++++++++++++++++++++++++"
- staticEndpoint : "https://sa4ecf74cb.z7.web.core.windows.net/"
Resources:
- 5 deleted
Duration: 1m42s
The resources in the stack have been deleted, but the history and configuration associated with the stack are still maintained.
If you want to remove the stack completely, run `pulumi stack rm dev`.
|
在以上命令执行的过程中,我们也可以在 Pulumi Cloud 网页中看到此项目的部署过程,以及资源的状态信息。还可以在 Azure 门户中,看到删除后的资源组和存储账户。
总结
您已成功使用 Pulumi 部署了一些云资源。在本指南中,您完成了以下操作:
- 创建了一个新的 Pulumi 项目。
- 在 Azure 上部署了一个新的存储账户和容器。
- 将一个 index.html 文件添加到容器中。
- 将 index.html 文件托管为静态网站。
- 销毁了已部署的资源。
在本指南中,您了解了如何使用 Pulumi CLI 和 Azure CLI 在本地 macOS 环境中,部署 Azure 资源。您还了解了如何使用 Pulumi Cloud 服务,用于存储 Pulumi 项目的状态信息,以及提供一些其他的服务。
参考文档:
