kops这种方式是我找到的最佳的,最适合于培训课堂需要的安装方式,当然对有类似需求的人有帮助。
Route53 DNS配置
kops需要使用DNS服务,用主机名提供k8s的相关服务访问。配置的注意点:
- 域名还是有必要有一个的,没有的话注册一个也不贵,以后用着也方便
- 建议在aws的Route53里做一个二级域名,例如:k8s.devopscoach.org
- 这个二级域名最好是能被正常公网解析的,为了便于直接访问集群里的服务
- 用 dig NS k8s.devopscoach.org 可以能正常解析(Mac上是这个命令)
由于全球的域名同步会需要一些时间,因此可以先做这一步,用到的时候,可能就已经同步好了。
kops会将所有主机的域名解析都自动化的添加A记录到这里。

安装工具准备
需要安装的工具包括 kubectl, kops 和 AWS CLI 工具。kops需要调用 AWS CLI来创建所需要的资源。我觉得简单的方法是:在目标的Region里创建一台Amazon AMI的虚拟机,这样AWS CLI就不用装了,而且在云里的话,执行kops的时候,由于有一大堆资源创建更新的api调用,感觉速度比在本机快很多,而且还用担心断网。
可以启动一台t2.micro规格的Amazon AMI即可,另外需要给这个实例配置如下IAM用户权限,在启动的时候选择合适的IAM Role。
- AmazonEC2FullAccess
- AmazonRoute53FullAccess
- AmazonS3FullAccess
- IAMFullAccess
- AmazonVPCFullAccess
这台虚拟机启动之后,安装kubectl和kops。
1
2
3
4
5
6
7
8
| curl -LO https://storage.googleapis.com/kubernetes-release/release/$(curl -s https://storage.googleapis.com/kubernetes-release/release/stable.txt)/bin/linux/amd64/kubectl
sudo chmod +x kubectl
sudo mv kubectl /usr/local/bin/kubectl
wget https://github.com/kubernetes/kops/releases/download/1.8.0/kops-linux-amd64
sudo chmod +x kops-linux-amd64
sudo mv kops-linux-amd64 /usr/local/bin/kops
|
准备ssh登陆秘钥,用户ssh登录各个ec2实例
 1
 2
 3
 4
 5
 6
 7
 8
 9
10
11
12
13
14
15
16
17
18
19
20
21
22
| [ec2-user@ip-172-31-27-182 ~]$ ssh-keygen
Generating public/private rsa key pair.
Enter file in which to save the key (/home/ec2-user/.ssh/id_rsa):
Enter passphrase (empty for no passphrase):
Enter same passphrase again:
Your identification has been saved in /home/ec2-user/.ssh/id_rsa.
Your public key has been saved in /home/ec2-user/.ssh/id_rsa.pub.
The key fingerprint is:
SHA256:oSPZf85vNsC7l9z24umLJs4tQ6qDMCrWfqAVXGYoA34 ec2-user@ip-172-31-27-182
The key's randomart image is:
+---[RSA 2048]----+
|o . |
|.o . + |
| .+E+ . |
| .o o . . |
| + + S. |
| oo . o + |
| .+o.. .o.+ o |
|oo .... .==.O.+. |
|o ... .o .*@+==+.|
+----[SHA256]-----+
[ec2-user@ip-172-31-27-182 ~]$
|
创建S3 bucket
这是用来存储Kubernetes群集的配置信息的,kops在创建、运行、更新和管理它创建的群集过程中,没个Cluster的信息可以保存在bucket的一个目录中。
1
2
3
| [ec2-user@ip-172-31-27-182 ~]$ aws s3 mb s3://clusters.k8s.devopscoach.org
make_bucket: clusters.k8s.devopscoach.org
[ec2-user@ip-172-31-27-182 ~]$ export KOPS_STATE_STORE=s3://clusters.k8s.devopscoach.org
|
创建完成后,将其放入环境变量中待用。
在集群安装完成之后,bucket里面的文件如下:

创建Kubernetes Cluster
命令行参数如下:
- kops create cluster //创建集群
- –cloud=aws //使用aws
- –zones=ap-northeast-1a //使用这个指定的zone
- –name=dev.k8s.devopscoach.org //集群的名字
- –dns-zone=k8s.devopscoach.org //集群所使用的DNS解析区
- –dns public //对公可访问
命令的执行结果如下。
 1
 2
 3
 4
 5
 6
 7
 8
 9
10
11
12
13
14
15
16
17
18
19
20
21
22
23
24
25
26
27
28
29
30
31
32
33
34
35
36
37
38
39
40
41
42
43
44
| [ec2-user@ip-172-31-27-182 ~]$ kops create cluster --cloud=aws --zones=ap-northeast-1a --name=dev.k8s.devopscoach.org --dns-zone=k8s.devopscoach.org --dns public
I0401 17:05:06.003257 30031 create_cluster.go:971] Using SSH public key: /home/ec2-user/.ssh/id_rsa.pub
I0401 17:05:07.132058 30031 subnets.go:184] Assigned CIDR 172.20.32.0/19 to subnet ap-northeast-1a
Previewing changes that will be made:
*********************************************************************************
A new kops version is available: 1.8.1
Upgrading is recommended
More information: https://github.com/kubernetes/kops/blob/master/permalinks/upgrade_kops.md#1.8.1
*********************************************************************************
I0401 17:05:12.605297 30031 executor.go:91] Tasks: 0 done / 73 total; 31 can run
I0401 17:05:13.546597 30031 executor.go:91] Tasks: 31 done / 73 total; 24 can run
-----此处删除了n个字符------
VPC/dev.k8s.devopscoach.org
CIDR 172.20.0.0/16
EnableDNSHostnames true
EnableDNSSupport true
Shared false
Tags {Name: dev.k8s.devopscoach.org, KubernetesCluster: dev.k8s.devopscoach.org, kubernetes.io/cluster/dev.k8s.devopscoach.org: owned}
VPCDHCPOptionsAssociation/dev.k8s.devopscoach.org
VPC name:dev.k8s.devopscoach.org
DHCPOptions name:dev.k8s.devopscoach.org
Must specify --yes to apply changes
Cluster configuration has been created.
Suggestions:
* list clusters with: kops get cluster
* edit this cluster with: kops edit cluster dev.k8s.devopscoach.org
* edit your node instance group: kops edit ig --name=dev.k8s.devopscoach.org nodes
* edit your master instance group: kops edit ig --name=dev.k8s.devopscoach.org master-ap-northeast-1a
Finally configure your cluster with: kops update cluster dev.k8s.devopscoach.org --yes
[ec2-user@ip-172-31-27-182 ~]$
|
kops命令列出了所有需要建立的资源清单。而真实的开始资源创建,并搭建和配置Kubernetes集群还需要执行,以上输出中提示的最后一条命令: kops update cluster dev.k8s.devopscoach.org --yes
执行结果如下:
 1
 2
 3
 4
 5
 6
 7
 8
 9
10
11
12
13
14
15
16
17
18
19
20
21
22
23
24
25
26
27
28
29
30
31
32
33
34
35
36
37
38
39
40
41
42
| [ec2-user@ip-172-31-27-182 ~]$ kops update cluster dev.k8s.devopscoach.org --yes
*********************************************************************************
A new kops version is available: 1.8.1
Upgrading is recommended
More information: https://github.com/kubernetes/kops/blob/master/permalinks/upgrade_kops.md#1.8.1
*********************************************************************************
I0401 17:13:02.482203 30077 executor.go:91] Tasks: 0 done / 73 total; 31 can run
I0401 17:13:04.389402 30077 vfs_castore.go:430] Issuing new certificate: "apiserver-aggregator-ca"
I0401 17:13:04.628667 30077 vfs_castore.go:430] Issuing new certificate: "ca"
I0401 17:13:07.291294 30077 executor.go:91] Tasks: 31 done / 73 total; 24 can run
I0401 17:13:09.273293 30077 vfs_castore.go:430] Issuing new certificate: "kubelet-api"
I0401 17:13:09.803612 30077 vfs_castore.go:430] Issuing new certificate: "kubelet"
I0401 17:13:09.809131 30077 vfs_castore.go:430] Issuing new certificate: "kube-scheduler"
I0401 17:13:09.973826 30077 vfs_castore.go:430] Issuing new certificate: "apiserver-proxy-client"
I0401 17:13:10.317412 30077 vfs_castore.go:430] Issuing new certificate: "kops"
I0401 17:13:10.321177 30077 vfs_castore.go:430] Issuing new certificate: "apiserver-aggregator"
I0401 17:13:10.440919 30077 vfs_castore.go:430] Issuing new certificate: "kube-controller-manager"
I0401 17:13:10.630182 30077 vfs_castore.go:430] Issuing new certificate: "kubecfg"
I0401 17:13:11.020560 30077 vfs_castore.go:430] Issuing new certificate: "master"
I0401 17:13:11.040010 30077 vfs_castore.go:430] Issuing new certificate: "kube-proxy"
I0401 17:13:12.698208 30077 executor.go:91] Tasks: 55 done / 73 total; 16 can run
I0401 17:13:13.609559 30077 launchconfiguration.go:333] waiting for IAM instance profile "nodes.dev.k8s.devopscoach.org" to be ready
I0401 17:13:13.656221 30077 launchconfiguration.go:333] waiting for IAM instance profile "masters.dev.k8s.devopscoach.org" to be ready
I0401 17:13:24.156701 30077 executor.go:91] Tasks: 71 done / 73 total; 2 can run
I0401 17:13:24.864262 30077 executor.go:91] Tasks: 73 done / 73 total; 0 can run
I0401 17:13:24.864379 30077 dns.go:153] Pre-creating DNS records
I0401 17:13:26.454177 30077 update_cluster.go:248] Exporting kubecfg for cluster
kops has set your kubectl context to dev.k8s.devopscoach.org
Cluster is starting. It should be ready in a few minutes.
Suggestions:
* validate cluster: kops validate cluster
* list nodes: kubectl get nodes --show-labels
* ssh to the master: ssh -i ~/.ssh/id_rsa [email protected]
The admin user is specific to Debian. If not using Debian please use the appropriate user based on your OS.
* read about installing addons: https://github.com/kubernetes/kops/blob/master/docs/addons.md
|
以上这套组合拳打出去之后,需要等几分钟才能完成Kubernetes集群的部署。
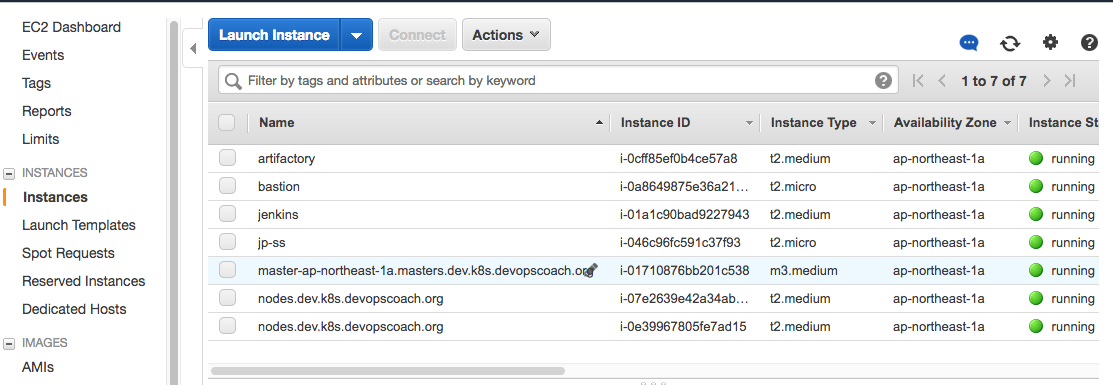
在以上实例中创建的Ec2实例如下:
- master-ap-northeast-1a.masters.dev.k8s.devopscoach.org //m3.medium
- nodes.dev.k8s.devopscoach.org //t2.medium
- nodes.dev.k8s.devopscoach.org //t2.medium

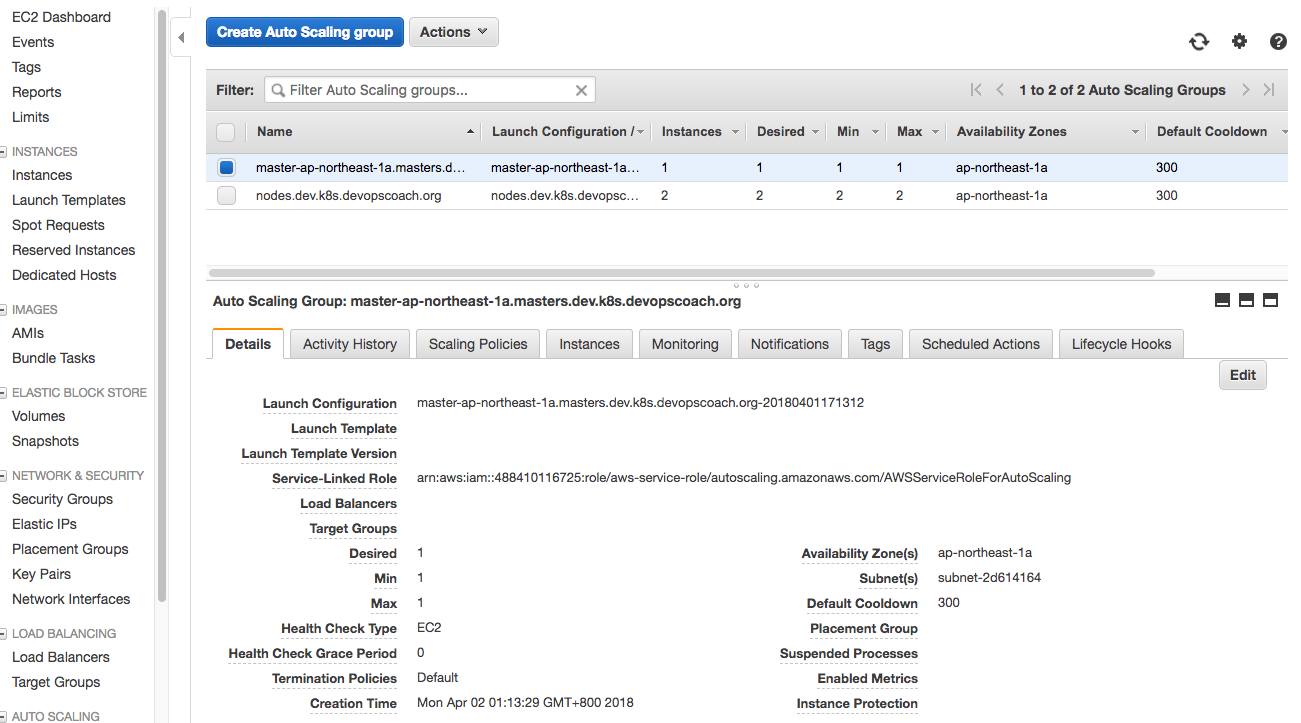
也创建了两个ASG:
- 一个是针对master的扩容规则
- 另外一个是针对worker node的扩容规则
从扩容规则为空可以看出,它主要是用于定义集群规格的,而非自动化扩容的。

在安装完成之后,用一下命令确认集群状态如下:
 1
 2
 3
 4
 5
 6
 7
 8
 9
10
11
12
13
14
15
16
17
18
19
20
21
22
23
| [ec2-user@ip-172-31-27-182 ~]$ kops validate cluster
Using cluster from kubectl context: dev.k8s.devopscoach.org
Validating cluster dev.k8s.devopscoach.org
INSTANCE GROUPS
NAME ROLE MACHINETYPE MIN MAX SUBNETS
master-ap-northeast-1a Master m3.medium 1 1 ap-northeast-1a
nodes Node t2.medium 2 2 ap-northeast-1a
NODE STATUS
NAME ROLE READY
ip-172-20-38-48.ap-northeast-1.compute.internal master True
ip-172-20-45-235.ap-northeast-1.compute.internal node True
ip-172-20-63-157.ap-northeast-1.compute.internal node True
Your cluster dev.k8s.devopscoach.org is ready
[ec2-user@ip-172-31-27-182 ~]$ kubectl get nodes --show-labels
NAME STATUS ROLES AGE VERSION LABELS
ip-172-20-38-48.ap-northeast-1.compute.internal Ready master 5m v1.8.7 beta.kubernetes.io/arch=amd64,beta.kubernetes.io/instance-type=m3.medium,beta.kubernetes.io/os=linux,failure-domain.beta.kubernetes.io/region=ap-northeast-1,failure-domain.beta.kubernetes.io/zone=ap-northeast-1a,kops.k8s.io/instancegroup=master-ap-northeast-1a,kubernetes.io/hostname=ip-172-20-38-48.ap-northeast-1.compute.internal,kubernetes.io/role=master,node-role.kubernetes.io/master=
ip-172-20-45-235.ap-northeast-1.compute.internal Ready node 4m v1.8.7 beta.kubernetes.io/arch=amd64,beta.kubernetes.io/instance-type=t2.medium,beta.kubernetes.io/os=linux,failure-domain.beta.kubernetes.io/region=ap-northeast-1,failure-domain.beta.kubernetes.io/zone=ap-northeast-1a,kops.k8s.io/instancegroup=nodes,kubernetes.io/hostname=ip-172-20-45-235.ap-northeast-1.compute.internal,kubernetes.io/role=node,node-role.kubernetes.io/node=
ip-172-20-63-157.ap-northeast-1.compute.internal Ready node 4m v1.8.7 beta.kubernetes.io/arch=amd64,beta.kubernetes.io/instance-type=t2.medium,beta.kubernetes.io/os=linux,failure-domain.beta.kubernetes.io/region=ap-northeast-1,failure-domain.beta.kubernetes.io/zone=ap-northeast-1a,kops.k8s.io/instancegroup=nodes,kubernetes.io/hostname=ip-172-20-63-157.ap-northeast-1.compute.internal,kubernetes.io/role=node,node-role.kubernetes.io/node=
[ec2-user@ip-172-31-27-182 ~]$
|
创建并访问服务
如下所示的创建两副本的nginx部署,部署的命令 sample-nginx。
1
2
3
4
5
6
7
8
9
| [ec2-user@ip-172-31-27-182 ~]$ kubectl run sample-nginx --image=nginx --replicas=2 --port=80
deployment.apps "sample-nginx" created
[ec2-user@ip-172-31-27-182 ~]$ kubectl get pods
NAME READY STATUS RESTARTS AGE
sample-nginx-7588757c8f-jvkjt 1/1 Running 0 5s
sample-nginx-7588757c8f-zq8tj 1/1 Running 0 5s
[ec2-user@ip-172-31-27-182 ~]$ kubectl get deployments
NAME DESIRED CURRENT UP-TO-DATE AVAILABLE AGE
sample-nginx 2 2 2 2 13s
|
然后将这个部署暴露为服务,使用到Kubernetes的命令如下:
1
2
3
4
5
6
| [ec2-user@ip-172-31-27-182 ~]$ kubectl expose deployment sample-nginx --port=80 --type=LoadBalancer
service "sample-nginx" exposed
[ec2-user@ip-172-31-27-182 ~]$ kubectl get services -o wide
NAME TYPE CLUSTER-IP EXTERNAL-IP PORT(S) AGE SELECTOR
kubernetes ClusterIP 100.64.0.1 <none> 443/TCP 10m <none>
sample-nginx LoadBalancer 100.64.127.19 ae3a1ca9235d111e890d706038dd676b-392190656.ap-northeast-1.elb.amazonaws.com 80:30363/TCP 25s run=sample-nginx
|
这条命令 ubectl expose deployment sample-nginx --port=80 --type=LoadBalancer 会创建一个ELB并将,集群里容正在运行的 sample—nginx 服务注册到这个ELB,然后就可以访问浏览到Nginx的默认页面了。

删除集群
用一条命令就能删除以上所建立的Kubernetes集群。
1
| kops delete cluster --name=dev.k8s.devopscoach.org --yes
|


